

How To Reduce Photo In Photoshop
Perhaps you've had an epic day shooting. But when you later look at the photos, they are grainy and soft. In that location is too much dissonance!
Practiced news! The images are probably not ruined. There are means to remove grain from the pictures with Photoshop techniques so there's not as much noise.
This step-by-step tutorial will explore two Adobe Photoshop denoise tools—the Noise Reduction filter and the Adobe Camera Raw filter. I will also bear witness yous how to use the Photoshop Neural Filter for JPEGs and plugins designed to reduce grain and make a picture clearer. Merely first, some groundwork data…
[Note: ExpertPhotography is supported by readers. Product links on ExpertPhotography are referral links. If you use i of these and purchase something, we brand a little bit of money. Demand more info? Meet how it all works hither.]


What is Noise?
Racket makes your picture wait grainy. They are tiny dots of light, sometimes colored, across your paradigm. I of the main reasons for noise in photographs is a high ISO.
With advances in camera technology, digital noise is less of a problem than had been with motion-picture show. ISO performance improves with each generation of camera bodies. Depending on your photographic camera, you may exist able to shoot at ISO 800, 1600, 2500, or even 5000 earlier yous notice grain in your images. Even then, you may just see it after zooming into the photo.
And noise is not necessarily bad. If you lot desire your photo to expect vintage, grain is fine. Most black and white images too look good with a flake of grain. But too much digital noise distracts the viewer from the subject, making the photo look soft and out of focus.
There are a couple of different types of dissonance.
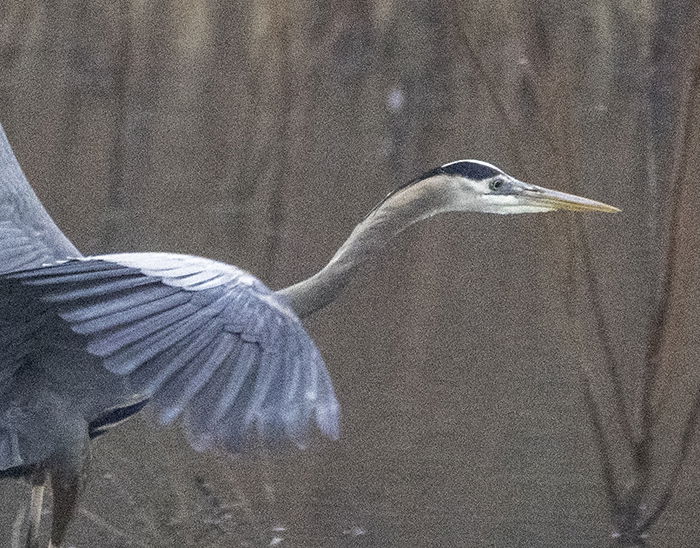
Luminance Noise
Luminance dissonance is the most common type of digital dissonance. This type of racket looks like grains of sand in your image. When y'all zoom in, some pixels seem brighter than others.
The heron in this photo was moving fast at dusk. At that place was no choice simply to increment the ISO to 6400 and fix the grain afterwards in mail-processing.
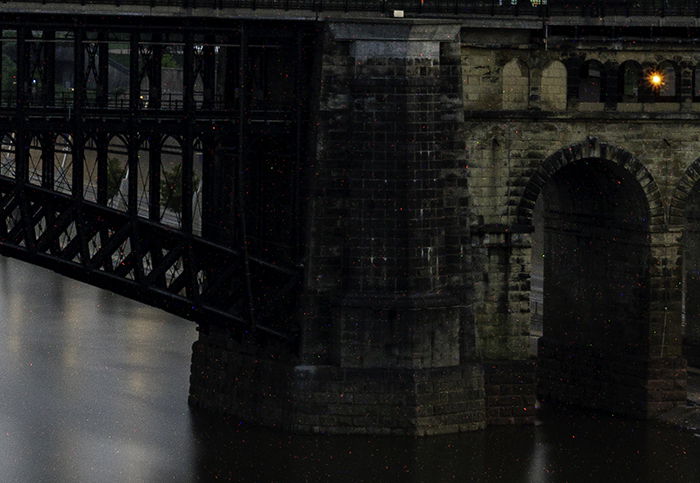
Color Noise
Color racket is also called chromatic aberration or chrominance racket. When isolated pixels pop out with a color like green or blood-red, you are looking at color noise. The colored dots do not go with the other colors in the epitome.
Color dissonance is created when your sensor gets hot. Even though I was on a tripod and shooting at ISO 100, this paradigm has red and light-green dots of color noise because it was a 183-second exposure.
How to Reduce Dissonance in Your Photographic camera
Denoise tools are for the worst-case scenario. Ideally, you lot want to brand the cleanest photograph possible with your camera. Start by lowering your ISO. A high ISO introduces grain into your image.
You may likewise come across grain if yous lighten shadows too much. Information technology helps if you apply a bright exposure to keep the shadows from getting as well dark. This is the reason to "expose to the right." The peaks on your histogram should favor the right-manus side of the graph.
How to Reduce Noise with Photoshop, Neural Filters, and Plugins
Sometimes though, information technology is impossible to avert dissonance. For example, you lot have to raise your ISO when photographing action in a dim space. But now, there are tools to assist you remove or reduce the grain during mail service-processing.
Kickoff, let's look at how to remove noise from a photo in Photoshop using two unlike filters. And then let'south wait at Photoshop'southward Neural Filter and plugins.
Noise Reduction Filter in Photoshop
Let'south starting time with the Reduce Noise filter. The filter is like shooting fish in a barrel to use, but you have to be careful with this tool. You practice non desire to introduce more dissonance into your epitome.
Step 1: Open Photo in Photoshop
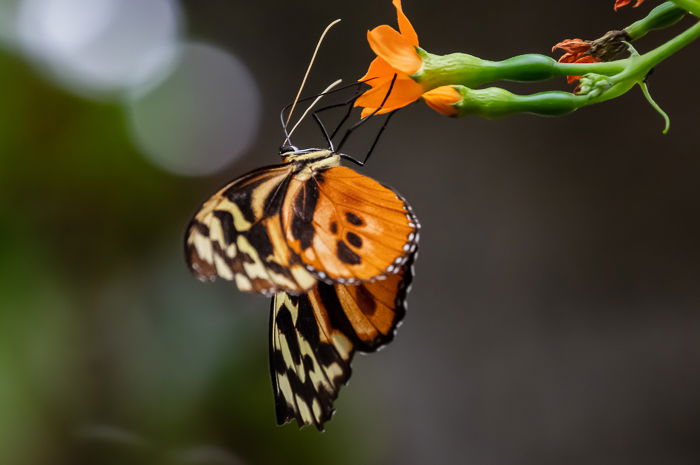
Open up a photo in Photoshop by going to the File dropdown menu and selecting File > Open. Then navigate to your image. I am going to use this photograph taken at ISO 8000. You tin see the digital dissonance if you zoom in on the butterfly and the textured background.
Footstep 2: Duplicate the Background Layer
Duplicate the original paradigm by going to the Layer dropdown menu and selecting Layer > New > Layer via Copy (Ctrl/Control+J). You tin as well drag the "Groundwork" layer downwardly to the new layer icon (plus sign) at the bottom of the Layers panel. So rename this layer "Denoise." You should have two layers in the Layers panel.
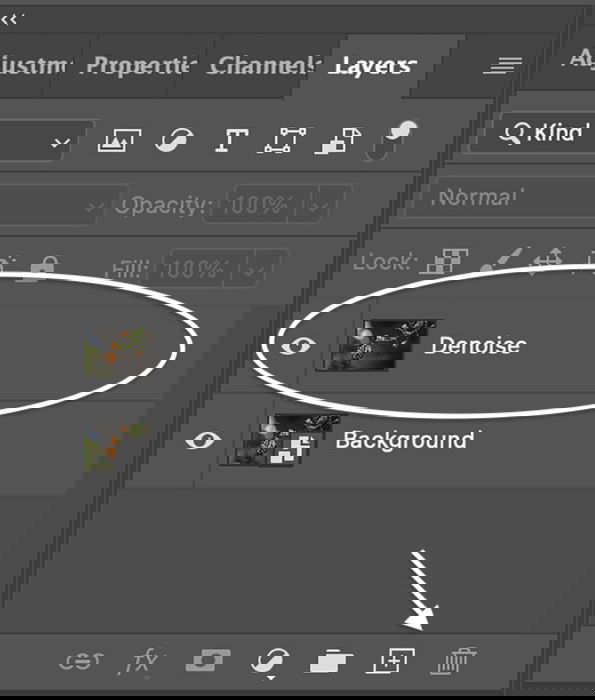
Step 3: Create a Smart Object
Convert the "Denoise" layer to a "smart object." You tin filter noise and so re-adjust your settings later with a smart object. Become to the Layer dropdown card and choose Layer > Smart Objects > Convert to Smart Object. An icon will appear in the lower right-mitt corner of the thumbnail.

Step 4: Open the Reduce Noise Filter Window
With the "Denoise" layer selected, go to the Filter dropdown menu. Choose Filter > Racket > Reduce Racket. (Discover there is some other filter you tin apply to add together noise in Photoshop. Y'all may want to do this to create a vintage wait.)
Position the preview screen to show your bailiwick. Past default, the preview will be at 100% zoom. Only you tin can change this.
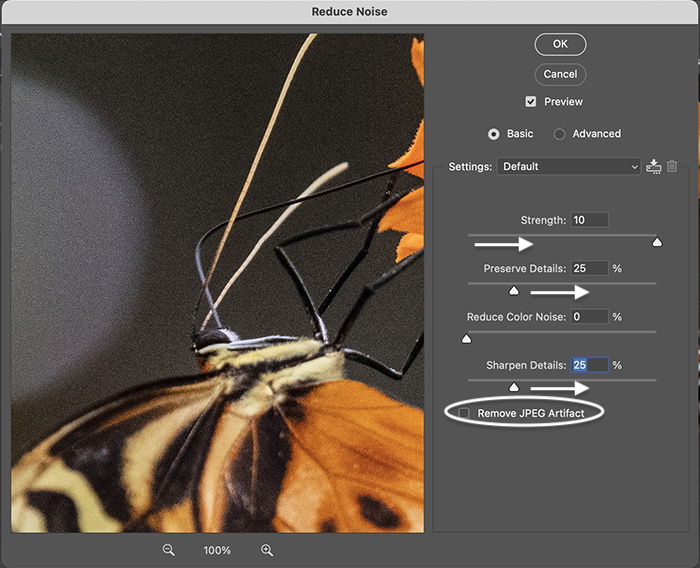
There are four sliders:
- Forcefulness
- Preserve Details
- Reduce Color Noise
- Sharpen Details
You also have a checkbox at the bottom that removes JPEG artifacts. The default Reduce Noise filter is the basic version. I will talk almost the advanced version as a 2d option.

Step five (Basic Version): Move Sliders to Reduce Noise
Even though it is not labeled every bit such, the Strength slider adjusts the corporeality of luminance noise. The scale is 0-ten. If there is color racket in your paradigm, move the Reduce Color Noise slider. The scale is 0-100%. I often prepare the forcefulness to a high number. But I only reduce colour noise if this is obvious in my image.
Sentinel the preview window for the changes. You may run across your photo go blurred and lose item. Information technology is a balancing act between reducing noise and retaining sharpness.
Use the Preserve Details and Acuminate Details sliders to bring back some lost particular. The scale for both sliders is 0-100%. Move the sliders in increments. Moving them as well much could create more than grain in your photograph.
If you are working with a JPEG, check the box at the bottom. But there is some other fashion of removing JPEG artifacts in Photoshop we will explore a little later.
Click OK at the top.
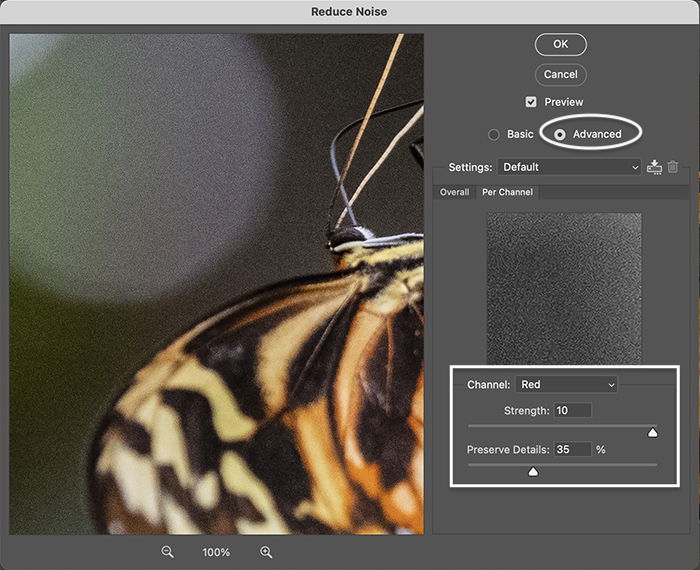
Step 5 (Advanced Version): Luminance Noise Reduction
The Reduce Noise filter in Photoshop has an avant-garde selection. This lets yous remove luminance noise in the cherry, light-green, and blueish color channels individually. If you have noise throughout your image, use the first choice. Just if one channel has most of the noise, the avant-garde option may be helpful.
Click OK at the peak.
Adobe Camera Raw Filter
You can also apply the Adobe Photographic camera Raw (ACR) filter to reduce dissonance in Photoshop. Steps one, ii, and 3 are the aforementioned every bit the ones for Reduce Racket filter. Open a photo in Photoshop, create a duplicate copy, and convert the new layer to a smart object.
Stride 1: Open up the Adobe Photographic camera Raw Filter
Select the Filter dropdown menu. Cull Filter > Camera Raw Filter (Shift+Ctrl/Command+A). This opens the ACR workspace. Reduce noise tools are under the Particular dropdown. You accept separate sliders for dissonance reduction (luminance) and colour noise. Also, there is an instruction to zoom in to 100% for more authentic control.
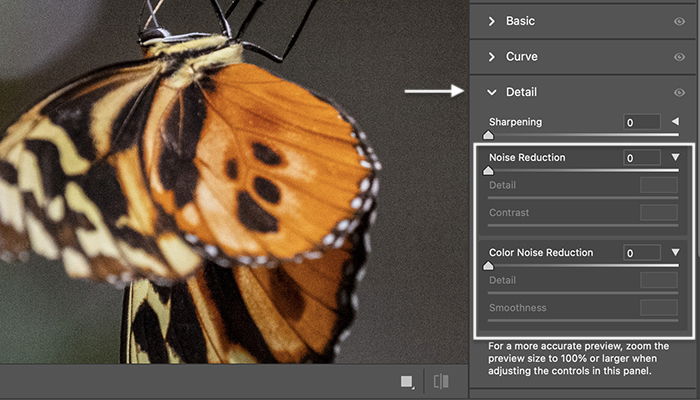
Stride 2: Move Sliders to Reduce Noise
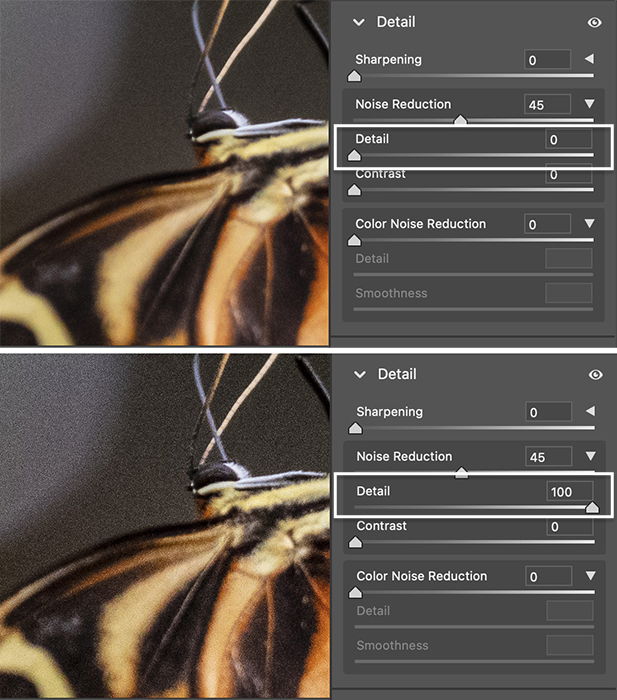
Fifty-fifty though information technology is non labeled as such, "Noise Reduction" adjusts the corporeality of luminance noise. The scale is 0-100. If at that place is color noise in your image, move the Color Noise Reduction slider. The scale is 0-100.
Hold the Alt/Choice key as you slowly drag the sliders. This turns your preview black and white. It is sometimes easier to see the grain. As with the Reduce Racket filter, calculation too much will soften the edges, and y'all will lose item. Most images have a fiddling noise. Once y'all move the main sliders, the Particular and Contrast sliders become active.
The Detail slider works like the Acuminate and Preserve Details sliders in the Reduce Noise filter. The higher the item value, the more details remain in your image—and more than grain. You have to notice a balance between reducing grain and keeping details. Calculation as well much detail volition also add more than noise.
Contrast is the difference betwixt the light and night tones in your image. A college contrast value emphasizes these differences and sharpens the photo. But more contrast also means more grain.
Since you lot are working with a "smart" layer, you can always re-suit the settings afterward.
Footstep 3: Reduce Noise and Mask
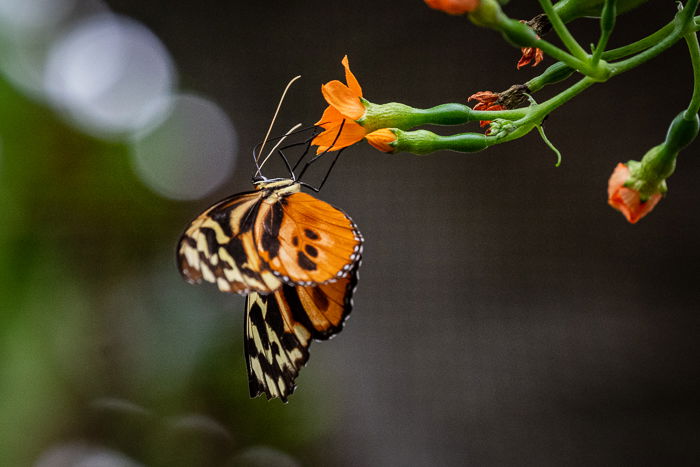
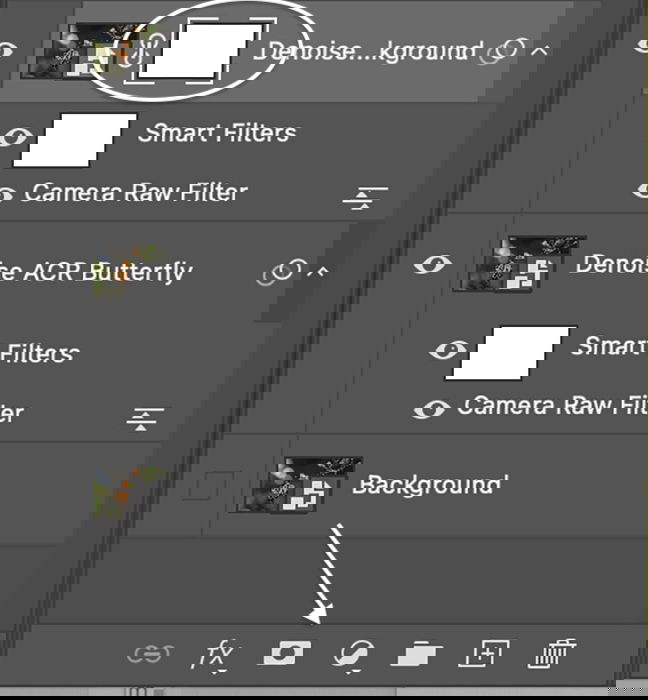
Tools that reduce noise in Adobe Camera Raw work like Lightroom. Merely using ACR means that you lot can mask the results in Photoshop. In my image, I reduced racket in two different ways. I created 2 layers—i for the groundwork and the other for the butterfly.
I heavily reduced the noise and added nothing item and contrast for the blurred background. I reduced the noise a bit less for the butterfly layer and added some detail and contrast. I too added a piffling sharpening.
I had two layers. I reduced luminance noise more in one. On the other, I balanced some dissonance with some sharpening detail. Select the layer with more digital racket and add together a mask. You lot can practice this by clicking the "Add vector mask" icon at the lesser of the Layers panel. A white mask appears next to the layer thumbnail.
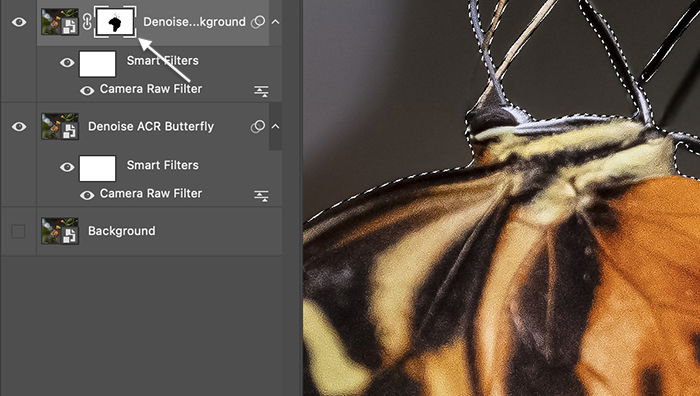
 Select the subject using one of Photoshop'south choice tools. I used the Subject selection tool. Marching ants appeared around the butterfly.
Using a soft, black brush, paint on the layer mask. Black hides this layer and reveals the layer underneath. We can reduce luminance noise at two different levels in the aforementioned image by masking the subject.
JPEG Artifacts Removal Neural Filter
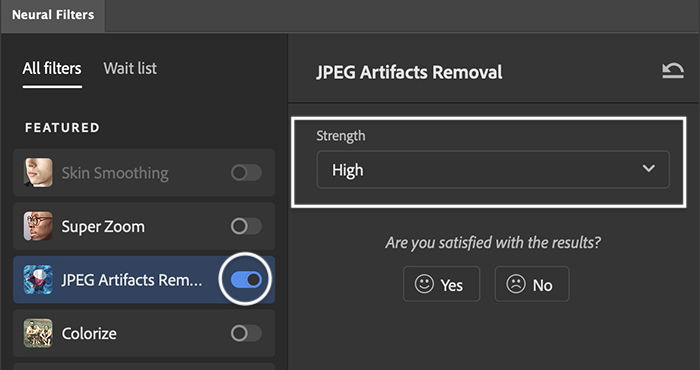
If you are working with a JPEG instead of a RAW file, you may want to utilize JPEG Artifacts Removal. This is a type of remove noise filter. It is one of Photoshop's new AI Neural filters.
Go to the Filter dropdown menu. Select Filter > Neural Filters. Toggle on the button next to the tool. You have a choice of low, medium, and loftier. Look for the processing to end. Then accept the changes.
Photoshop Noise Reduction Plug-In
Recently, at that place has been an explosion of software tools that remove noise. Some are office of complete programs. Others are stand-lonely programs or plugins that work with Photoshop. If you want to know my top pick, become to our article on noise reduction software for photographers.
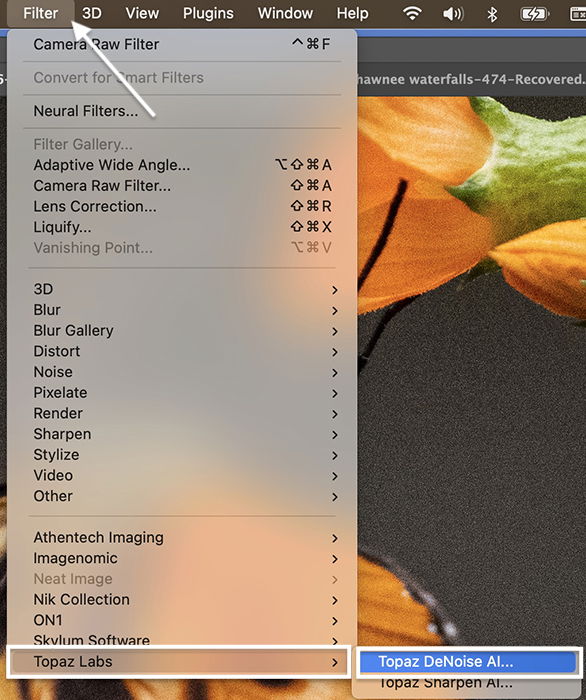
1 of the acknowledged noise plugins is DeNoise AI by Topaz Labs. After you lot install the program, it appears nether the Filter dropdown menu. You lot can make changes in DeNoise AI. When you click Apply, the results appear every bit a layer in Photoshop.
Conclusion
Using the Reduce Noise filter, removing noise from your image is easy in Photoshop. Or you tin can use the noise tools in the Adobe Camera Raw filter. With these tools, yous can reduce luminance noise and colour noise. If the Photoshop noise reduction tools are not enough, in that location are other denoise programs. Many work as plugins within Photoshop.
Details will polish out after reducing noise. Rest the noise reduction past retaining particular and structure. With all these denoise Photoshop tools at your fingertips and knowing how to reduce dissonance in Photoshop, you can fix those photos ruined past excessive grain!
Try out our Products in Focus due east-book for professional tips to edit your photos to perfection!
Source: https://expertphotography.com/reduce-noise-photoshop/
Posted by: ashcraftincentens.blogspot.com
0 Response to "How To Reduce Photo In Photoshop"
Post a Comment